Showing posts with label beautyblog. Show all posts

Monday, February 3, 2014

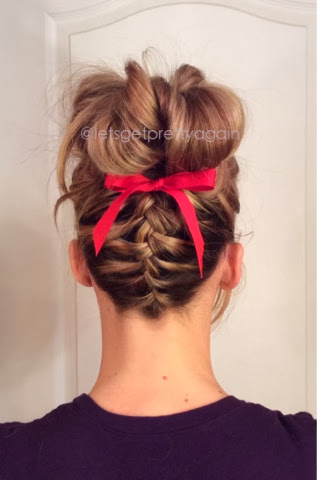
Upside Down Braid

The Upside Down Braid 


This look is a braid up the back of your head into a messy bun. SO different and super cute.


Begin with your head upside down so your hair is hanging toward the braider:


Grab a small section as shown and begin to french braid down the middle of the head


Once you get halfway up the head, put a small elastic at the end of the braid to secure it.


Flip your head up and style the front as desired.  We pulled Angela's hair into a halfway pulled through ponytail. Make sure you include the elastic rubber band so it doesn't poke out the bottom of the bun.


We used bobby pins to pin the bun different ways to give it more texture. You could also do a top-knot here. 


We added a red bow at the base of the bun in honor of Valentine's Day ;) 
It also draws more attention to the braid! 


We love this look and hope you do too! 

Thursday, January 30, 2014

French Twist Those Bangs!


A few years ago, I was playing around with the front pieces of my hair and came up with a cute way to french twist my bangs back! It is trendy, quick, easy and hides the grease :)

Start with your hair parted further over than usual.
Tease the hair around the crown of your head. (I always tease my hair before I style it. I can't stand seeing bed head or a part that goes all the way down the back of heads lol) 
Don't be afraid to get some height. Remember, your hair will fall, especially after you play with it.
Next, grab the front section of your hair. Divide the section into two larger pieces.
Let the twisting begin!  Twist the sections of hair around each other - away from your face.

Each time you twist, pick up another section of hair around your face. Essentially, you are just french twisting these pieces of hair.
Continue twisting toward your ear.

When you get passed your ear, take a bobby pin that blends with your hair and slide it in from the bottom pointing upwards.
If one bobby pin doesn't feel tight enough, you can add another by crossing it over making an 'X' to lock them in.
You can leave your hair down with some loose/natural waves...
Or pull it into a pony or braid!
Hope this will help you the next time you're running late or when you're just too lazy to wash your hair :)

We would love to see you make this style your own. Send us pictures and comment below!

- Angela Liljenquist


Tuesday, January 21, 2014

Dramatic Wing

Today's look is perfect for any of you that like to vamp up your look! A Dramatic Wing is a sexy yet easy way to maximize drama on the face. Angela used two products for this look on Marianne, L'Oreal Liner (in a pot) and a small paint brush - a total of only $ 12.00. 

Get ready for some serious VAMP as we walk you through 4 easy steps of the Dramatic Wing!
  

Begin with your face prepped as usual. If you are going to wear eye-shadow, you should also apply that during this step. Marianne is only wearing foundation and mascara: 
 
Next, get your favorite cream eyeliner. We love cream eyeliner because it's extremely versatile (we also like liquid liner, but cream gives a softer look). We have tried everything from MAC's Fluidline to the dollar store brands and this is our very favorite: L'Oreal Lacquer Liner in Blackest Black.

To save money, we use a paint brush found at JoAnn. They are cheap, durable and come in all different shapes and sizes. Simply dip your brush in the cream liner, beginning with a moderate amount of product on the brush and draw!  Remember, you can always add more! 
Start in the inner corner of the eye and drag the brush outward along the lash line. The more pressure you apply with the brush, the thicker the line will be. Get a solid base, then go over it a few times. 
And now, for the wing!
Draw a thin line extending from the end of your lash line toward your temple.  Angle the line toward the end of your eyebrow.  To complete the shape of the wing, draw another line from the tip of the wing in to connect with the outter corner of your eye.
Fill in the open space with more liner.  You can see that we brought the line slightly underneath Marianne's eye, this makes the wing look more natural. 

Once you have your basic wing shape, you can build on it to make it thicker, darker and more dramatic!
We thickened and darkened Marianne's look for fun!

We brought the eyeliner under her bottom lashes, making her eyes pop even more. Have fun with this!

To complete the look, add a little blush and highlighter to the cheeks and cheekbones. We used Buxom Blush in Shangri-La-La and Benefit Watt's Up! highlighter.


Simple and Dramatic!


Monday, January 7, 2013

Double Front Braid

We are totally loving braids this season!  It is a great way to add personality to your hair and SO easy.  Today we are going to show you how to do a "double front braid" perfect for long and short hair. Angela will be the model for today so don't mind her dark roots, it just adds dimension, right?! ;) 


Prep your hair to your likings, i.e. straight, curl, natural, etc. We parted Angela's hair over a little further than usual because we like that look with braids and it just gives you more space to show off your braid :)


Take a section of hair on the back half of the part (about 1x1 inch) and separate into three to start the braid. I did about 3 or 4 inside braids before actually picking up hair to create the french look.


Continue that pattern till about 2 inches above the ear.  This will make the braid less uniform and thin because you're not picking up as much hair. This was the look we wanted so if you want a more clean and uniform look go ahead and pick up hair every time you cross!


Once you stop the french, finish the braid off and secure. You can use a small elastic or I just used a bobby pin because it will only be temporary.


Begin second braid (just like the first) leaving you bangs or the section of hair closest to the hair line out. This will give you more of a soft look. If you want your hair out of your face, you can braid it all.


Again adding hair to the braid about every 3 or 4 patterns. I am getting the hair from underneath the braids rather picking it up from the sides. We can do this because we aren't picking up hair every time and this will allow the braids to be closer together.


Stopping the french pattern about 1 inch above the ear for the front braid and continuing the braid down to the end.


Section off the back hair, middle hair (hair between the braids), and front hair.


Pin the back braid so it is secure against the head and low enough to be covered by the loose hair.


I like to use two bobby pins and cross them like an "X" so they wont slip and will be secure.


Using the same technique pin the front braid down just above/behind ear in an "X" so it will be tight and hidden. You will want to keep the middle section of loose hair out because that is what will cover and hide your bobby pins.


Adjust lose hair over the bobby pins and it should fall naturally over the bobby pins. If not pull the braid back and under the hair a little more.


Finish with a little tease at the crown and spray to hold.


You can see that the braided sections of hair are not clean and distinct. I think it looks better this way. We've tried it before using clean parted sections and an outside braid but it looked like "corn rows" and that was not the look we were going for!


 It looks great pulled back into a pony as well, so play with it and have fun!


Thanks for visiting!

~ Angela and Marianne