Friday, March 14, 2014

Time to Celebrate!


Hello Everyone!

Not only are we excited for the weekend, but we are STOKED because Marianne graduated from Cosmetology school this week! We want to celebrate with you by sharing this fabulous weekend look. It's simple enough for daytime yet the lips give it drama making it perfect for a night out!

Here's what we used:


Step 1 Face: Apply foundation to clean, moisturized face. Marianne loves this foundation because it leaves a satin finish. She has dry skin so this is perfect for her.
Step 2 Shadow: Apply Day Rate (light pink/beige) from Catwalk pallet all over eyelid. In the crease, use Strut (dark violet) to give depth. Be careful not to use too much product and apply in small circular motions focusing on the outer corner. To add a little shimmer and pop, apply 10k (light gold metallic) to brow bone and center of lid.
Step 3 Line: Using a very small skinny liner brush (we use an art brush), take the fluid line starting at the outer corner of the eyelid and draw towards the center, stopping just before the inner corner. Then extend a flick from outer corner to add a little drama. Try to keep the line more narrow, this will define your eyes without an overbearing look. Apply mascara to both upper and lower lashes.
Step 4 Cheeks: Apply blush to apples of cheek and draw upward towards temples. Dust cheekbone with highlighting powder.
Step 5 Lips: Line lips with Jewel liner and then fill in the outer corners and blend towards center. This will give your lips dimension and shape. Apply the lipstick, and then go back with the liner and reline your lips. Doing this gives you a solid, defined line and will create a perfect pout.


We hope you like this and let us know if you have any questions! Oh and yes Marianne does have pink hair - post coming soon :)


Monday, February 17, 2014

Valentine's Look of the Day - Bold Lip & Wing

Hi Everyone! We hope you had a lovely Valentine's Day. We sure did! We wanted to show you a very simple yet stunning look that can be used everyday. Angela rocked this look for Valentine's Day at work and on a little musical outing we did. A friend asked us to be a "singing gram" for her fiance, so we took our guitars and surprised him with "their" song.We love seeing and being involved with LOVE in this world!

Anyway, back to the makeup! We didn't do a step by step because this look is simple and what you see is what you get. Feel free to ask us any questions or if you would like the break down.


FACE - Angela prepped her face with Makeup Forever HD Foundation and set it with Cover FX Pressed Mineral Powder. She used our favorite  Buxom True Hue Blush to give her cheeks some color.

LIPS - She then lined her lips with MAC Redd, and filled them in with Makeup Forever's Rouge Artist Intense Lipstick in Satin Vermilion Red. This stuff is amazing!!! Great color payoff and it stays on ALL day. Angela wanted to add some dimension to her lips so she took MAC's Currant Lip Liner and lined her lips once more.


EYES - Angela used only two eye shadow shades, cream eyeliner, and mascara. Any light and dark combo of eyeshadow will work for this look using the light all over then blending the dark into crease. Using the wing tutorial we showed you here a few weeks ago, she created a nice wing that was appropriate for day.  She filled her waterline with the cream liner, but didn't put any under her bottom lashes, making it a very clean look. She finished with her favorite mascara and this stunning look was done in 15 minutes!


Thanks for reading!

- Angela Liljenquist

Monday, February 3, 2014

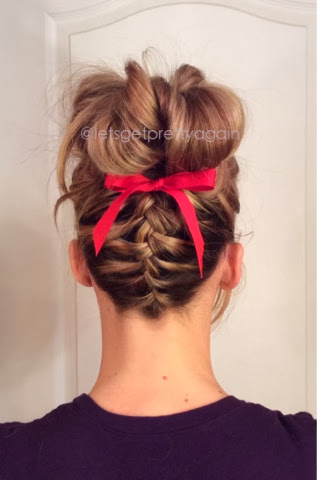
Upside Down Braid

The Upside Down Braid 


This look is a braid up the back of your head into a messy bun. SO different and super cute.


Begin with your head upside down so your hair is hanging toward the braider:


Grab a small section as shown and begin to french braid down the middle of the head


Once you get halfway up the head, put a small elastic at the end of the braid to secure it.


Flip your head up and style the front as desired.  We pulled Angela's hair into a halfway pulled through ponytail. Make sure you include the elastic rubber band so it doesn't poke out the bottom of the bun.


We used bobby pins to pin the bun different ways to give it more texture. You could also do a top-knot here. 


We added a red bow at the base of the bun in honor of Valentine's Day ;) 
It also draws more attention to the braid! 


We love this look and hope you do too! 

Thursday, January 30, 2014

French Twist Those Bangs!


A few years ago, I was playing around with the front pieces of my hair and came up with a cute way to french twist my bangs back! It is trendy, quick, easy and hides the grease :)

Start with your hair parted further over than usual.
Tease the hair around the crown of your head. (I always tease my hair before I style it. I can't stand seeing bed head or a part that goes all the way down the back of heads lol) 
Don't be afraid to get some height. Remember, your hair will fall, especially after you play with it.
Next, grab the front section of your hair. Divide the section into two larger pieces.
Let the twisting begin!  Twist the sections of hair around each other - away from your face.

Each time you twist, pick up another section of hair around your face. Essentially, you are just french twisting these pieces of hair.
Continue twisting toward your ear.

When you get passed your ear, take a bobby pin that blends with your hair and slide it in from the bottom pointing upwards.
If one bobby pin doesn't feel tight enough, you can add another by crossing it over making an 'X' to lock them in.
You can leave your hair down with some loose/natural waves...
Or pull it into a pony or braid!
Hope this will help you the next time you're running late or when you're just too lazy to wash your hair :)

We would love to see you make this style your own. Send us pictures and comment below!

- Angela Liljenquist


Friday, January 24, 2014

Textured Ponytail

We would like to begin this post by inviting you to contact us to get your hair colored/styled or makeup done! Email us at liljenquistangela@gmail.com to schedule an appointment. We are located in the greater Salt Lake City, Utah area and would love to meet you and make you pretty again!

Now for the post!  This is for all of you that want to spice up your everyday ponytail.


Begin by teasing the hair in the crown area. 


Take 3 sections from the corner of the head.  You can begin closer to the ear, but we chose not to.


Start a French braid by picking up sections from only the bottom (under the braid).


Continue braiding, while pulling the hair toward the left side. Make sure you are only using hair from the front right side (not the top!).


Finish the braid and use bobby pins to hold the ends.


On the left side, pin hair loosely as shown.  


We had fun with the bobby pins and made them visible, creating a triangle. Be creative here!


Pull all of the hair to the left side and secure it with an elastic.


Take a section of hair from underneath the pony and wrap it around to hide the elastic. Pin to secure.


Go through the braid and pull the sections to give it added texture and look more undone!


We finished with hairspray and shine spray, using Big, Sexy Hairspray and Moroccan Oil Shine Spray.


This look is perfect for work or a week night!


Let us know how the textured pony works for you!

Tuesday, January 21, 2014

Dramatic Wing

Today's look is perfect for any of you that like to vamp up your look! A Dramatic Wing is a sexy yet easy way to maximize drama on the face. Angela used two products for this look on Marianne, L'Oreal Liner (in a pot) and a small paint brush - a total of only $ 12.00. 

Get ready for some serious VAMP as we walk you through 4 easy steps of the Dramatic Wing!
  

Begin with your face prepped as usual. If you are going to wear eye-shadow, you should also apply that during this step. Marianne is only wearing foundation and mascara: 
 
Next, get your favorite cream eyeliner. We love cream eyeliner because it's extremely versatile (we also like liquid liner, but cream gives a softer look). We have tried everything from MAC's Fluidline to the dollar store brands and this is our very favorite: L'Oreal Lacquer Liner in Blackest Black.

To save money, we use a paint brush found at JoAnn. They are cheap, durable and come in all different shapes and sizes. Simply dip your brush in the cream liner, beginning with a moderate amount of product on the brush and draw!  Remember, you can always add more
Start in the inner corner of the eye and drag the brush outward along the lash line. The more pressure you apply with the brush, the thicker the line will be. Get a solid base, then go over it a few times. 
And now, for the wing!
Draw a thin line extending from the end of your lash line toward your temple.  Angle the line toward the end of your eyebrow.  To complete the shape of the wing, draw another line from the tip of the wing in to connect with the outter corner of your eye.
Fill in the open space with more liner.  You can see that we brought the line slightly underneath Marianne's eye, this makes the wing look more natural. 

Once you have your basic wing shape, you can build on it to make it thicker, darker and more dramatic!
We thickened and darkened Marianne's look for fun!

We brought the eyeliner under her bottom lashes, making her eyes pop even more. Have fun with this!

To complete the look, add a little blush and highlighter to the cheeks and cheekbones. We used Buxom Blush in Shangri-La-La and Benefit Watt's Up! highlighter.


Simple and Dramatic!